Contents
Oracle- Forms - PL/SQL
Database
Orders and Tables
PL/SQL
Oracle- Forms
© The scientific sentence. 2010
|
Oracle Forms Builder
Oracle Forms Builder
4. Using Oracle Forms Builder
An application needs a program running in the background first. We will rrun
its related instance server OC4J. All the time, let alive the related
black and white screen, while working with Forms Builder. Do not close
that window. Minimise it.
 Now, we are going to build a form, follow the steps:
4.1. Start > Programs > Oracle Developer Suite � DevSuiteHome1 >
Forms Developer > Start OC4J Instance,
4.2. Run Forms Builder:
Start > Programs > Oracle Developer Suite � DevSuiteHome1
> Forms Developer > Forms Builder,
4.3. We get the Object Navigator window, inside the Oraclwe Forms Builder
window.
We have already built the insurance tables database within
Oracle database. Now, we will build a form to contain the attributes
of the first table "customer".
4.4. We need first to connect to our Oracle database server: File > Connect,
4.5. Type the oracle user name and password. The database name is: (here �XE�),
4.6. Make a data block: Start the Data Block Wizard:
Tools > Data Block Wizard,
4.7. In the welcome window, click next,
4.8. Select "Table or View", click next,
4.9. Browse to select a table from our Oracle database,
-- Select "customer" from the popup tables windiw among the (several)
others, click OK,
-- The attributes of the table "customer" are listed. Click on the double
right arrow (>>) to select all of the attributes (one may choose the needed
number of attributes, for eample in the case of "JOIN"),
-- Tape a name for this Data Block (the default name might be the right)
-- Press Next,
4.10. In the congratulation window, to create a layout for our data block,
choose "Create the data block, then call the Layout Wizard". Press finish,
4.11. We get the Layout Wizard's Welcome. Press Next,
4.12. In the new screen, select canvas name and type that needed to use, or
accept the default values, click Next,
4.13. Select the attributes that you want to show in the form (for all the
items, click on the ">>"), Press Next,
4.14 By right clicking, you can choose "properties" and set of the
properties of the form, accept the default values and press Next,
4.15. Select a layout style for the block, click Next,
4.16. Select a title for this form. Select also the number of records that will be
displayed, and check scrollbar if needed, click Next,
4.17. In the congratulation window, press Finish
-- The Builder pops up the created form ..
Now, we are going to build a form, follow the steps:
4.1. Start > Programs > Oracle Developer Suite � DevSuiteHome1 >
Forms Developer > Start OC4J Instance,
4.2. Run Forms Builder:
Start > Programs > Oracle Developer Suite � DevSuiteHome1
> Forms Developer > Forms Builder,
4.3. We get the Object Navigator window, inside the Oraclwe Forms Builder
window.
We have already built the insurance tables database within
Oracle database. Now, we will build a form to contain the attributes
of the first table "customer".
4.4. We need first to connect to our Oracle database server: File > Connect,
4.5. Type the oracle user name and password. The database name is: (here �XE�),
4.6. Make a data block: Start the Data Block Wizard:
Tools > Data Block Wizard,
4.7. In the welcome window, click next,
4.8. Select "Table or View", click next,
4.9. Browse to select a table from our Oracle database,
-- Select "customer" from the popup tables windiw among the (several)
others, click OK,
-- The attributes of the table "customer" are listed. Click on the double
right arrow (>>) to select all of the attributes (one may choose the needed
number of attributes, for eample in the case of "JOIN"),
-- Tape a name for this Data Block (the default name might be the right)
-- Press Next,
4.10. In the congratulation window, to create a layout for our data block,
choose "Create the data block, then call the Layout Wizard". Press finish,
4.11. We get the Layout Wizard's Welcome. Press Next,
4.12. In the new screen, select canvas name and type that needed to use, or
accept the default values, click Next,
4.13. Select the attributes that you want to show in the form (for all the
items, click on the ">>"), Press Next,
4.14 By right clicking, you can choose "properties" and set of the
properties of the form, accept the default values and press Next,
4.15. Select a layout style for the block, click Next,
4.16. Select a title for this form. Select also the number of records that will be
displayed, and check scrollbar if needed, click Next,
4.17. In the congratulation window, press Finish
-- The Builder pops up the created form ..
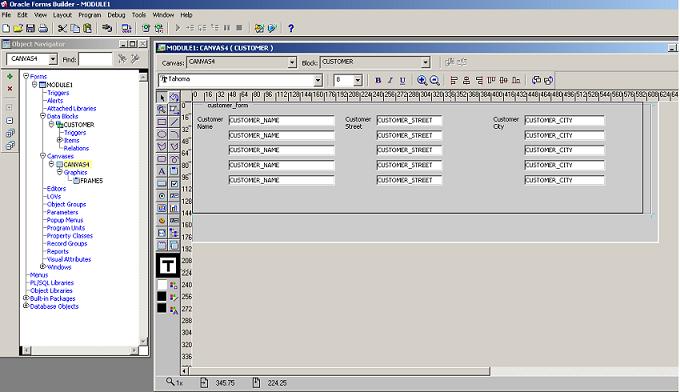 4.18. We can, by a right click > Properties > Property Palette, set of some
needed features for the form and its elements.
Now, we want to run the form created ..
4.18. We can, by a right click > Properties > Property Palette, set of some
needed features for the form and its elements.
Now, we want to run the form created ..
5. Running the form created
To run the created form, select "Program >Run Form" from the bar menu of the
"Oracle Forms Builder" window, or press the correspondant icon.
For the first running, we need the Oracle JInitiator. We can install this
programm via pluging. If it's not the case, we are leaded to the Download Page:
http://host:8889/forms/jinitiator/us/jinit_download.htm, to install it.
Press "Dowload Oracle JInitiator 1.3.1.22. Once downloaded,
we get jinit.exe program. Just double-click (we can accept the default destination
directory or choose another destination), to have it installed.
Back to the "Oracle Forms Builder" window and run the form or restart the browser.
Click on "Execute Query" to download data in the table. We have the following screen:
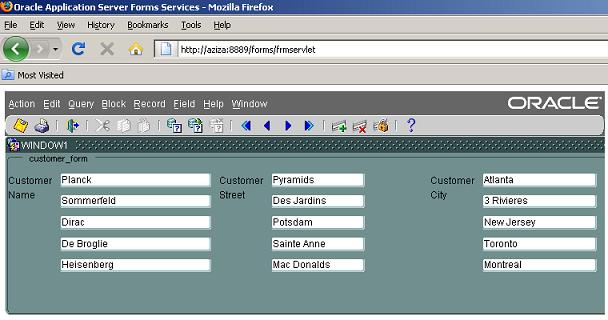 Use the blue arrows to navigate or modify data. If you change data, you
need to send and commit it.
Each form created generates a file that we have to save before leaving
the Builder. It is MODULE1.fmb. To save it, chose any
destination directory. Fetch this file when calling a module.
Use the blue arrows to navigate or modify data. If you change data, you
need to send and commit it.
Each form created generates a file that we have to save before leaving
the Builder. It is MODULE1.fmb. To save it, chose any
destination directory. Fetch this file when calling a module.
|
|
|